Showing posts with label diy. Show all posts

14 Days of Love

I hate/completely despise/loathe/can't stand/am repulsed by/resent even just thinking about what to get/do for Colten for Valentine's Day. Every. Single. Year. He's a typical guy, for the most part. He gets his hands dirty, isn't overly sensitive or romantic, loves playing video games and anything camouflage. 

With that in mind, what the heck do you get for your man for Valentine's Day?! That runs through my mind every year, until now. In doing some actual research and scouring Pinterest, I came across a blog {surprise, surprise right? ;)} that had me at: 
So remember how I kinda neglected my husband on Christmas.

Tiffany over at Raising Lemons posted about her idea for Valentine's Day last year, and I was hooked instantly. Check out her post {here}. Her idea was to go along with the catchy '14 Days of Valentine's' theme for her husband, but with a twist. Instead of doing corny little gifts every day {"I chews you," with chewing gum...}, she decided to focus on her husband's love language. Umm, thank you! From there, my 14 Days of Love commenced. 

Immediately, I knew I would be doing that this year, so I began on the several daunting tasks that laid ahead of me. I would start on February 1st and the last day would be on the 14th, Valentine's Day. First up: the list. I knew that Colten's love languages are acts of service and physical touch. How do I know? Well, he took the quiz, of course! Yes, there's a quiz. If you don't know what the love languages are, head over here to check them out! Since Colten tied on these two, I decided to incorporate them both into our 14 Days of Love. 

THE LIST
1. long kiss

2. wash dishes

3. foot massage

4. make the bed

5. buy groceries

6. long embrace

7. cook dinner

8. hold hands at the movie

9. breakfast in bed

10. 30 minute massage

11. laundry 

12. snuggle while watching tv together

13. Ace duty

14. full service 

Up next was creating a banner that would hold/display each day's surprise. Again, I went with Tiffany's idea but made it my own. I started with a trip to Hobby Lobby - where else? I purchased a pack of the mini craft sacks in brown, a tiny heart box {to trace the hearts}, and paper! 

I traced hearts onto some heart paper I purchased and cut them out. 

 
Then, I numbered the hearts 1-14 and glued each one onto a craft sack! Seriously easy stuff here, y'all. 

 
Next up were the cards - I used cardstock, cut them to size using the measurements of the craft sacks (2.5"x4") and then wrote the "physical touch" and "acts of service" activities on them. 


I then used jute that I already had at home to hang on our bar in the kitchen and attached the sacks using mini clothespins that I had purchased previously for my thankful tree. {Sorry about the unbelievably blurry pic on this one...}


We're on day 13, and Colten is loving it! I had to get a little creative for day 1 because we were out of town for the weekend. I wrote him a letter explaining the 14 Days of Love idea and even kissed the letter by signature for an extra special touch! I rolled up the letter, added day 1's card, and tied it together with some jute. Then, all I had to do was keep my big mouth shut until February 1st when I could finally reveal my plans! It's hard for me to keep a surprise a secret, so I was definitely tested. But, I did it! He really enjoyed the idea and has been looking forward to each day's activity. 

It's just a special way to really show your spouse that you love them {on a budget}, and what better way to do that than through their love language?! I considered our schedules in planning out each day's activity, and I definitely rearranged the order as we received our work schedules and things came up. It worked out because he didn't know what the next day held anyway, as long as he didn't snoop! 

Instead of just doing little things around the house, I added just a few extra surprises in the mix, such as a movie night! I incorporated the "physical touch" aspect by holding hands during a movie and will surprise him with movie tickets after he opens the card {that's tonight's plan}. I received an email from Treat.com that presented an opportunity to personalize my 14 Days of Love even further! I will be able to present the tickets in a personalized card, just for him! I was blown away by the cards from Treat and the ease of creating them! 

Treat.com is a Shutterfly affiliate that specializes in personalized greeting cards. I love what they say on their website: "Relationships aren't cookie cutter, so why should greeting cards be?" Seriously though, what a great idea! You're able to customize a card for any occasion {Valentine's Day, birthdays, anniversaries, sympathy, thinking of you, etc.} for anyone on your list! All you have to do is create an account {for free} and get to personalizing! With an account, you can set up reminders about something coming up that needs a card, schedule a card to be sent in the mail, and even send digital cards if time isn't on your side! 

I received two cards, one for Valentine's Day, and one to hold the surprise movie tickets and just to tell Colten that I love him. Look at how great they turned out...


The cards are way more gorgeous in person! The picture quality is clear {as long as you've uploaded a good picture} and the cards themselves are super thick! I chose to have them mailed to me so that I could give them to Colten myself, but Treat also provides the option to mail a card directly to the receiver. Super convenient! I know I'll be doing business with this company in the future. What better way to show a loved one you care than by personalizing a greeting card they can cherish forever?! No more cards being thrown away, people. This is a new era. 
#ANGRY_TEXT

No more missed birthdays, long checkout lines
or last-minute drugstore dashes.

We make it easy to stay thoughtful all year long—from the comfort of your couch.
*via*
The 14 Days of Love was a big commitment to take on, but I'm so glad I did! I was held accountable for all the things I said I would do, and by doing it through Colten's love language, I was really able to focus on loving him and not be distracted by my own wants and needs. It's definitely a Valentine's Day we won't forget!
 

**I was not compensated financially for this post. I received these cards from the kindness of Treat's social media team. The opinions are 100% my own**

Thankful Tree: {DiY}

Yes, you read that title right. I'm about to explain a diy project I did, which means I got crafty, y'all! It was great :).  And now the craftiness is gone for a while...again. Oh well. I sure did love this craft, though!

I'm continuing in all of the thankfulness from November - my cup overfloweth. Seriously. So, what better way than to show you all my November thankful project?!

The initial search for this project was unbelievable because there are literally SO MANY different ways you can create your special tree! Seriously, go google 'thankful tree diy' and there are tons of different variations! So, get creative! And if you lack creativity like myself, head on over to Crafts Unleashed for the version I stuck pretty closely to. While I didn't veer off too much from this tutorial, I did have to get creative {so to speak} with a few parts. Here's the lo-down on the thankful tree diy.


What you'll need:
+ twigs/branches
+ paper mache box
+ masking tape
+ casting plaster
+ green moss
+ silk fall leaves
+ fun decorations and embellishments


Not too bad, huh? I found all of these {besides the branches and silk leaves} at Hobby Lobby! No surprise there! The branches came from our apartment complex - straight from nature! And, the silk fall leaves I actually found at Dollar Tree. SCORE! Crafts Unleashed has options to buy from their site as well, but I was too impatient to wait for the stuff to get to me! So, Hobby Lobby and Dollar Tree it was. Definitely my go-to's! I'm not ashamed.

Directions: {I'm not going to into deep, thorough details here because you can find them very specific at Crafts Unleashed! I didn't sway [much], I swear!}

Collect branches and tape together in the pattern that you like the best.


Mix the casting plaster {yes, I actually used casting plaster - the stuff is cheap!}


Add the plaster to the paper mache box. Then, immediately add your branches! {I also included a giant, sparkly flower to my project, so I added that at this time as well.} The very crafty Shaunte over at Crafts Unleashed propped hers up with a photo easel and a clip. I, however, just held it for a few minutes until it started setting. It worked just fine, as I was pretty distracted by the tv show I was watching at the time. Thank you, Castle!


Now, cover the base of the tree so the plaster and tape don't show! You can use the green moss for this; however, my hot glue did not hold at all for this part, so I had to sort of wing it!  I got enough of it to stick, but it was a hassle.


Then, I followed the creative advice of Shaunte, once again, and used mini clothespins to add the cuteness to my tree! Seriously! Use the clothespins to add the leaves and other embellishments to your tree. It's also a way to change up the tree for the different seasons! I'm on the hunt for some cute snowflakes for Christmas!

I also got Colten to join in on the fun {I won't lie - he also helped me with the plaster part; I didn't want to make a 'huge' mess! Also, he searched for tree branches. That's true love right there!}. He wrote what he was thankful for on one of the tags, as did I! They add such a cute and personal touch to this project! I love it!


Then, decorate the bottom of the tree however you'd like! I added a mini chalkboard rectangle so that I can change out what it says for each season. For my thankful tree, though, it says "So thankful...". I also hot-glued some ribbon to the base of the paper mache box {which is actually the lid}! Country chic for sure! Well, to me anyway! :)


This project was pretty inexpensive and so much fun! It defniitely added some fall spirit to our home!
 
 
   photo signature_zps02c8012c.jpg

{Jeweled Frame}: DiY

Have you ever felt that your home decor just needed 'something' but you couldn't quite place your finger on it?
 
Well, problem solved RIGHT.HERE. 
 
That's right. This weekend, I tackled a project, from start to finish! Y'all, this is BIG because that almost never happens!  (good thing it was easy)
 
I have sort of a gallery wall up in our apartment and absolutely love it! However, I keep feeling that something is just 'missing'.  Our color scheme is neutrals/browns with turquoise accents.  Very rustic and VERY warming.  I love it! But, I just couldn't place what was missing.  But then it hit me - that wall had nothing with the turquoise/blue accent! It was a beige wall with tones of naturals and browns hanging on it in the decor.  And I just had to fix it. 
 
Saturday after working some overtime, I headed over to the Dollar Tree.  Yes, I'm a proud supporter and frequent shopper of the place. It's a DOLLAR, mom! (great memories).  I picked up some supplies for only a dollar and headed home.  
 
I present: 
 
 
What you need:
//gems
//frame
//hot glue gun
 
That's all? 
 
YES!  This was a seriously inexpensive project and I'm absolutely in love with the final product! 


I've had the frame for a while now, and it's just been hanging on the wall like this ^^.  Pretty pathetic, I KNOW! My husband jokes that we have random family members up on the wall becasue I have several frames with no printed pictures in them.  Sad day.  BUT, one day, that'll all change - I hope!
 
Directions:
Because you haven't already figured it out from here, all you do is simply glue the gems onto the border of the frame!  I used the small gems and they fit PERFECTLY!
 
 
**disclaimer**
I did set out the gems on the frame prior to gluing them, because I was afraid of getting to the end of a side and having more frame but not enough room for a gem, so I'd definitely recommend that!
 
Also, if your frame is wider, you can do a fun design or use different size gems! It's up to you!  And my inspiration, this post from The Fun Cheap or Free Queen. Seriously, you can glue these suckers on ANYTHING to bring some life to it!  So awesome. 
 
Here's my final product:
 

Now to print a picture to get up in that beauty!  Yes, 'up in that'! :-) 

Have a blessed Wednesday, friends! 

And any Wednesday would not be complete without this:

 photo signature_zps02c8012c.jpg

{Burlap Wreath}: DiY

Yes, friends, my very first DO IT YOURSELF post!  Mostly, because I'm lazy, too tired, lacking patience too busy to really see a project through these days.  Ultimately though, I've learned that I'm just not crafty. 
 *cringe* 
That's right, I said it...I'M NOT CRAFTY!  I have zero creative juices flowing through my veins.  And in today's Pinterest society, this fact sucks!  But, that will definitely not keep me from pinning everything I absolutely love and dream of creating on my pinboards or from attempting said projects.  That's right, I'll just pretend to be crafty.  That'll work :).  

So, last weekend, I had the urge to finally attempt at making a burlap wreath.  Our apartment decor is definitely 'country' and rustic, so a burlap wreath was a must!  I searched the interwebs and decided on a simple plan: metal wreath form and burlap that we had leftover from our wedding over a year ago!  And, project make-a-pretty-wreath commenced!  

And then it suddenly came to a screeching halt!  I did not account for needing so much burlap, so I had to buy more, which ultimately was not the same shade of burlap (yes, it's a 'thing', so be careful out there!  It's a jungle...) as the original stuff, so I had to decide how to proceed.  This was not supposed to be a super time-consuming, expensive project.  So, to keep it from being such, I broke down and bought a smaller wreath form.  I originally purchased an 18" one, which is the only size Hobby Lobby had, other than super-tiny, and thought it would be fine.  Well, after realizing just how much burlap would be needed, I bought a 12" frame, which I ultimately love even better anyway!  There would just be too big of an opening in the middle for the bigger wreath, so I'm very pleased.  Anyway, it turned out great and I'm super excited to see it hanging on the wall every day - that is, hoping it stays on the wall...  And now I'm going to fill you in on how I pretty much winged it for this DiY:  

How-To Make a Burlap Wreath (My Way):

You will need: 
• wire wreath form (which can be found at typically any craft store, providing there are any left in stock...) 
burlap ribbon (this stuff comes on a roll - mine was about 5 inches wide or so
patience (I struggled with this one...) 
• scissors
cute embellishments 

Steps: 
1. Dive in.  Yes, I was frustrated as heck beginning this project, but I found that if I just tried it a few ways a few times, I'd eventually figure out a way that worked for me, and I did!  I took a loop of the burlap and wrapped it through one of the slots of the frame.  I then created another loop, and slid it through another slot (there are three slots in my wreath form).  


2. Get close! Each time I made another loop, I scrunched the existing loops close together to create fullness in the wreath.  This also helped to hide the ugly green metal that tended to want to be seen by all the world.  
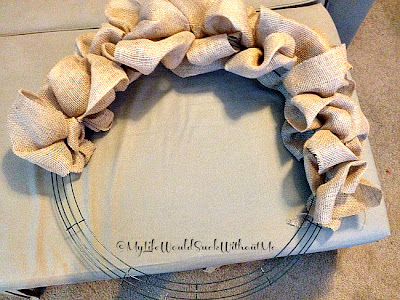

3. Get creative.  Now, for those of you that haven't completely given up on me still reading this, you already know that I had to pretend for this part.  Remember the ugly green metal that wanted all of man to see it?  Yeah, it's annoying.  It also needed a fix!  I thought, "Hey, why couldn't I just staple the burlap together around the metal so that it would always stay?"  Well, friends, I tried that.  Those shiny silver staples showed from miles away.  So, that plan was out.  I found a few blogs online about this project that had other alternatives.  One was to use natural-colored pipe cleaners, cut into thirds, and use it to adhere the burlap to the frame.  Great idea!  Only, lo and behold, the Michaels I went to did not carry natural-covered pipe cleaners.  And, I just wanted to be DONE with this project.  So, I improvised and just moved the burlap around enough times (which means about a bajillion times) that the green metal did not show, and I must admit I did a pretty good job!   Wrapping it around enough and scrunching the material together held the entire project together, and I don't think it's lacking because it's not 'officially' secure using some type of twine, pipe cleaners, jute, etc. 

4. Add a touch of Y-O-U!  Since our accent color has quickly become turquoise (we have curtains in this color...it's awesome!), it was pretty much a no-brainer that I wanted to add turquoise to this wreath.  I bought a cute curly wood 'R' from Hobby Lobby and instead of painting it, I bought turquoise colored tulle and wrapped the 'R' in it. It created more texture than simply adding paint.  And a heck of a lot less messier!  I attached the letter using clear fishing wire, which hid amazingly because you can loop it through the natural holes of the burlap!  Score!  I then used some remaining tulle to add a cute, messy bow to the top where it's hanging on the wall!  The husband didn't notice it at first when he came home, but he loves it too, now that he knows it's hanging on his wall :).  

FINAL PRODUCT: 


So, my craftiness is gone for a while now, but it'll be back!  What do you think of my new amazing addition to our home decor?!  And you can be honest if you don't like it...it'll suit me just fine!
Pin It button on image hover