Yes, friends, my very first DO IT YOURSELF post! Mostly, because I'm lazy, too tired, lacking patience too busy to really see a project through these days. Ultimately though, I've learned that I'm just not crafty.
*cringe*
That's right, I said it...I'M NOT CRAFTY! I have zero creative juices flowing through my veins. And in today's Pinterest society, this fact sucks! But, that will definitely not keep me from pinning everything I absolutely love and dream of creating on my pinboards or from attempting said projects. That's right, I'll just pretend to be crafty. That'll work :).
So, last weekend, I had the urge to finally attempt at making a burlap wreath. Our apartment decor is definitely 'country' and rustic, so a burlap wreath was a must! I searched the interwebs and decided on a simple plan: metal wreath form and burlap that we had leftover from our wedding over a year ago! And, project make-a-pretty-wreath commenced!
And then it suddenly came to a screeching halt! I did not account for needing so much burlap, so I had to buy more, which ultimately was not the same shade of burlap (yes, it's a 'thing', so be careful out there! It's a jungle...) as the original stuff, so I had to decide how to proceed. This was not supposed to be a super time-consuming, expensive project. So, to keep it from being such, I broke down and bought a smaller wreath form. I originally purchased an 18" one, which is the only size Hobby Lobby had, other than super-tiny, and thought it would be fine. Well, after realizing just how much burlap would be needed, I bought a 12" frame, which I ultimately love even better anyway! There would just be too big of an opening in the middle for the bigger wreath, so I'm very pleased. Anyway, it turned out great and I'm super excited to see it hanging on the wall every day - that is, hoping it stays on the wall... And now I'm going to fill you in on how I pretty much winged it for this DiY:
How-To Make a Burlap Wreath (My Way):
You will need:
• wire wreath form (which can be found at typically any craft store, providing there are any left in stock...)
• burlap ribbon (this stuff comes on a roll - mine was about 5 inches wide or so)
• patience (I struggled with this one...)
• scissors
• cute embellishments
Steps:
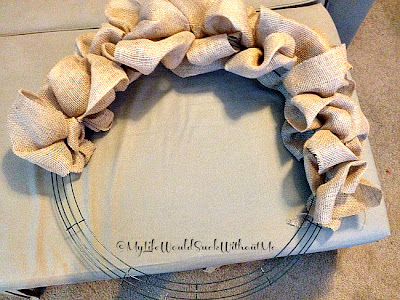
1. Dive in. Yes, I was frustrated as heck beginning this project, but I found that if I just tried it a few ways a few times, I'd eventually figure out a way that worked for me, and I did! I took a loop of the burlap and wrapped it through one of the slots of the frame. I then created another loop, and slid it through another slot (there are three slots in my wreath form).
2. Get close! Each time I made another loop, I scrunched the existing loops close together to create fullness in the wreath. This also helped to hide the ugly green metal that tended to want to be seen by all the world.
3. Get creative. Now, for those of you that haven't completely given up on me still reading this, you already know that I had to pretend for this part. Remember the ugly green metal that wanted all of man to see it? Yeah, it's annoying. It also needed a fix! I thought, "Hey, why couldn't I just staple the burlap together around the metal so that it would always stay?" Well, friends, I tried that. Those shiny silver staples showed from miles away. So, that plan was out. I found a few blogs online about this project that had other alternatives. One was to use natural-colored pipe cleaners, cut into thirds, and use it to adhere the burlap to the frame. Great idea! Only, lo and behold, the Michaels I went to did not carry natural-covered pipe cleaners. And, I just wanted to be DONE with this project. So, I improvised and just moved the burlap around enough times (which means about a bajillion times) that the green metal did not show, and I must admit I did a pretty good job! Wrapping it around enough and scrunching the material together held the entire project together, and I don't think it's lacking because it's not 'officially' secure using some type of twine, pipe cleaners, jute, etc.
4. Add a touch of Y-O-U! Since our accent color has quickly become turquoise (we have curtains in this color...it's awesome!), it was pretty much a no-brainer that I wanted to add turquoise to this wreath. I bought a cute curly wood 'R' from Hobby Lobby and instead of painting it, I bought turquoise colored tulle and wrapped the 'R' in it. It created more texture than simply adding paint. And a heck of a lot less messier! I attached the letter using clear fishing wire, which hid amazingly because you can loop it through the natural holes of the burlap! Score! I then used some remaining tulle to add a cute, messy bow to the top where it's hanging on the wall! The husband didn't notice it at first when he came home, but he loves it too, now that he knows it's hanging on his wall :).
FINAL PRODUCT:
So, my craftiness is gone for a while now, but it'll be back! What do you think of my new amazing addition to our home decor?! And you can be honest if you don't like it...it'll suit me just fine!


No comments:
Post a Comment